Showing posts with label Maybelline. Show all posts

Tuesday, March 8, 2011

Maybelline Spring Blossoms 2011 Collection - Pure Mineral Two-Way Cake Foundation

Since its launch last year, I have been contemplating whether I should get this foundation or not. I bought the BB cream version of the Maybelline Pure Mineral range (but wasn't too impressed), and kind of wanted to try the powder version of the foundation.

Spring Blossoms 2011 Collection, SGD19.90

So when I spotted this set at Watsons, I was like "Wow!" for these reasons:

1. This comes with a limited edition casing.

2. It's only $19.90 refill + casing. Usual price: $27.90 (refill - $19.90, casing $8) I am just paying for the refill!

3. I have always wanted to try the foundation.

Then I thought, WHAT AM I WAITING FOR?

Limited Edition Collectible Case & Pure Mineral Two-Way Foundation

OC 1

I am a M.A.C NC-20, and the color OC1 matches my skin tone perfectly. Very natural. Not too fair at all.


The powder is very smooth and very fine. Coverage I consider light to medium light. Being very used to using higher coverage type of foundations like the SK-II Cellumination Cream Foundation, I would only use this as a setting powder/ powder for touch ups. Yes -- it's that light! As you can see from the photo above, the color OC1 blends entirely well with my skin tone -- I can't see the foundation at all!

Positive points of this foundation:
1. Breathable coverage: lightweight micro-minerals gives a smooth finish that doesn't clog pores
2. More hydrated skin: helps refine fine lines!
3. Suitable for sensitive skin: contains no preservatives, fragrance or oils.
4. Mineral foundation at an affordable price!

Not-so-good points of this foundation:
1. Light coverage
2. Average oil control

I might not repurchase this foundation, as I find the oil control ability average. My normal La Mer loose powder seems better. The coverage is also also too light. Since this is a foundation, I expect it to cover.

Wednesday, November 24, 2010

Tutorial: Day to Night Look with Maybelline Hyper Diamonds Ready to Wear Eye Palette BU#1

Yesterday, I received a tutorial request from Icecherie, who asked if I could do a tutorial with the Maybelline Hyper Diamonds Ready to Wear Eye Palette BU#1, which I posted about not too long ago. I LOVE tutorial requests~ because it shows that I have readers who like my tutorials... YAY~!
I have decided to create 2 looks with the palette. Eye palette used:

From left to right, top to bottom: silver sparkle, frosty white, frosty light blue, frosty medium dark blue, black with sparkles

DAY LOOK
(for work perhaps?)
to
NIGHT LOOK
(time to head to out for a drink after work!!)
For some reason, why do my eyes look so strange when I look at the camera??!

DAY LOOK~
The Steps:
1. Apply eye primer. I think eye primer is a must for this Maybelline palette. The eyeshadow is quite powdery, so the color payoff will be better with eye primer.

2. Use the sponge applicator provided in the palette and apply the white eyeshadow all over your crease.

3. Line 2/3 of the lower lash line with the light blue eyeshadow.

4. Take the silver sparkle and apply to the inner corner of the lower lash line.

5. Line your eyes. Line the lower water line as well.

6. Apply black mascara. I prefer to put false lashes as I find it too time consuming to put 2-3 coats of mascara in the morning.

DAY LOOK FINISHED!!

NIGHT LOOK~
The Steps:
1. This is how the eyes will look at first.

2. Apply the light blue to 2/3 of your eyelid, starting from the inner corners.

3. Apply the dark blue to the remaining 1/3 of the eyelid at the outer corners.

4. Line the lower lash line with the dark blue.

5. Apply some black eyeshadow at the upper lash line, starting from the middle of the lash line, outwards to the outer corner. It's like lining your eyes with eyeshadow instead of eyeliner. I didn't line the whole of my upper lash line because I wanted more color at the outer conner of the eye only. I hope I am making sense here.

6. Take the black to go over the dark blue at the lower lash line.

7. Touch up on the color at the inner corner of the lower lash line with the white eyeshadow.

8. Re-line the eye with black eyeliner if the original eyeliner has already smudged.

9. Use your finger and dub some silver sparkle on the middle of the eyelid.

NIGHT LOOK COMPLETED!

For some reason, I realise that I have done a lot of tutorials using blue eyeshadow! I am thinking of doing a green smoky eyes tutorial soon~

Thursday, November 18, 2010

*UPDATED* Review: BB Cream Comparison (Skin Food, Maybelline, Skin79, Freshel)

BB Cream stands for 'Blemish Balm Cream'. It is a foundation with skincare properties, like moisturising effect, whitening effect, wrinkle improvement etc... The cool thing about BB cream is that it's like an 'all-in-one' cream - after you put your daily moisturiser, you don't need sunblock, makeup base and foundation to achieve flawless skin. All you need is just one cream, your BB cream. It functions as sunblock, makeup base and foundation! As a BB cream is still a cosmetic and NOT a skincare product, you still need to remove it with makeup remover every night! Never sleep with your BB cream on =D

As compared to a lot of bloggers, my collection of BB cream is small. These are the only 4 I have:

SKIN79, VIP Gold Collection, 40g, SGD39 (approx...)

This is by no means a new product ^^" So many bloggers have blogged about this already hahaha... But anyway, I will still talk briefly about this...
This BB cream claims to:
1. whiten,
2. protect against UV rays (SPF25 PA++),
3. reduce appearance of wrinkles.

Kanebo Freshel White C W Cream UV, 50g, SGD33

This BB cream claims to:
1. moisturise the skin,
2. covers pores and dullness,
3. protect against UV rays (SPF32 PA++) and resists fading (Ok I have no idea what this means?? Resists fading?? Hmmm like the foundation will stay put and last all day?),
4. acts as makeup base and foundation.

Maybelline Clear Smooth Minerals BB Cream, 18g, SGD16.90 (I think...)

This is what the product claims to do:
1. brightens skin,
2. covers imperfections, reduce appearance of pores, skin redness disappears,
3. moisturises + protects against UV rays (SPF26 PA+++)

Skin Food Agave Cactus Sun BB Cream, 40g, SGD49.90 (ekkks extremely overpriced. Buy it in Korea if you can!! Or try buy from Korea BB)

You can squeeze out the product from the nozzle

Or use the in-built sponge applicator (which I find totally useless... because you can't wash the sponge)

This product claims to:
1. provide long moisture retention
2. give UV protection (SPF36 PA+++)

Left to right: SKIN79, Freshel, Skin Food, Maybelline

AFTER BLENDING:
Left to right: SKIN79, Freshel, Skin Food, Maybelline

The following review is based on my skin condition and color.

I am a M.A.C NC20. I have normal to combination skin, with a slightly oilier T-zone and dryer cheeks. I have a few faint pimple scars, slightly larger pores on skin near to nose area, but general skin condition is good. A few dark spots (sob sob) on my cheeks.

Although all 4 colors are different, all 4 seem to suit my skin color when applied (as you can see from 2nd swatch photo, all blend well).

SKIN79:
Texture: Slightly thick
Coverage: Sheer
Color: Fair, pink base (looks almost grey isn't it?)
*Oil Control: Fair

Freshel:
Texture: Slightly thick
Coverage: Medium to full
Color: Beige (seems to suit my skin color best!!)
Oil Control: To Be Updated. I just bought this today, so I have not tested it out yet. Please come back tomorrow and I will update on this page!!

*UPDATE*:
Oil Control: Good. It's oil control power is the same as the Skin Food BB Cream on my skin.

Skin Food:
Texture: Like typical foundation, just right
Coverage: Medium
Color: Beige Pink
Oil Control: Good, perhaps because it moisturises well?

Maybelline:
Texture: To the thin side, almost like emulsion
Coverage: Sheer to medium
Color: Slightly fair, Pink base
Oil Control: Average

*Oil control meter:
Poor --> Fair --> Average --> Good --> Excellent

For me, when I select foundation, I definitely go for beige shades instead of pink shades. However, surprisingly, all the colors with pink base work for me (Skin79, Skinfood, Mayeblline). I suspect the reason might be the sheer to medium coverage instead of full coverage!

For all 4 BB Creams, I don't smell any strong scent when applied, but that could be just me ^^

Personally, my favorite so far is the Skin Food Agave Cactus Sun BB Cream... but I have a feeling I might switch to Freshel after trying it out tomorrow!! Just a feeling...

*UPDATE*: Right now, I like both Skin Food and Freshel equally. The Freshel BB cream is really easy to apply and I am able to spread the product evenly without effect on my skin. However, I can't say that it is better then Skin Food because the oil control power is not better but only equal. Oh how I wish that I could find a foundation that can really control the oil on my face!!

I hope this post has helped anyone looking for a BB Cream!

Saturday, November 6, 2010

Maybelline Hyper Diamonds New Colors!
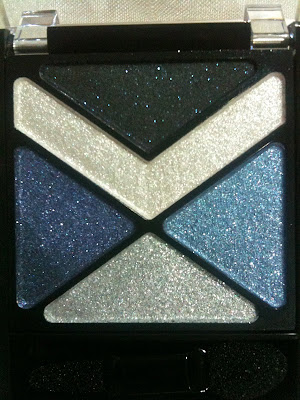
I totally remember myself raving about Maybelline's Hyper Diamonds Eye Color Palettes in August. Guess what? I spotted 2 new colors at Watson's last week! They are a brown (darker then BR-1) and a smoky blue. Since I am kind of crazy over blue eyeshadow, I finally brought it home after thinking about it for a week. The texture of the eyeshadow is the same as before, quite powdery (as they contain so much shimmer), therefore I recommend using the colors with eyeshadow primer to minimize fall outs.

Maybelline Hyper Diamonds Eye Color Palette BU-1, SGD19.90

The black eyeshadow (liner color) is the most interesting color here, as it contains blue shimmer!

Another new product that got me excited was the Hyper Diamonds Liquid Liner. They come in 3 colors -- black, purple and silver. They are not exactly pure glitter liners, but they do contain glitter/sparkles/shimmer in them, so the lines you get are really shimmery! Goes perfectly with the Hyper Diamonds eye palettes. All the glitter/sparkles/shimmer present in all the liners are silver. I got the black and the purple.

Maybelline Hyper Diamonds Liquid Liner, SGD17.90 each

Black and purple

My camera just cannot pick up all that shimmer and shine!

I managed to wash the liner off with cool tap water after I did the swatches, so I am pretty sure the liners are not waterproof! Make sure you do not tear when you are wearing this liner =D

Thursday, October 21, 2010

Tutorial: How to Apply Mascara that Curls All Day

Hi~~ Today I have prepared for you a few tips on how to apply mascara that curls really nicely and lasts all day!

One of the reasons for my fascination in mascara and false lashes is that I have really STRAIGHT and SHORT lashes -- a very common problem for some asians. To make matters worse, my lashes are super RESISTANT TO CURLS and very often than not, droops after I apply the wrong type of mascara base/ mascara. Usually, the non-waterproof formulas will be too heavy for my lashes, so I have to go for smudge proof and waterproof ones.

If you have the same problem as me, this tutorial will be perfect for you!

I learnt this mascara application method from the Taiwanese celebrity makeup artist Kevin (not in person but his book haha), who makes regular appearances in the Taiwanese variety show Queens (女人我最大). He has published 2 excellent books on makeup (everything you need to know about makeup -- from base makeup, eyeshadow,mascara, lipcolor to false lashes application). If you understand Chinese, do check out his blog!

Before you continue reading on, I must confess that this is not my 'best applied mascara'. It appeared a bit clumpy in the end. Why I want to mention this is because I want to assure you that this method really works; the cause for the uneven application is I was flustered that day and was a bit clumsy when I applied the mascara =D

FINISHED LOOK - only mascara (without eyeliner!!):

BEFORE (ekks!):

Materials needed:
1. Eyelash curler
2. Electric eyelash curler (optional)
3. Eyelash comb (optional)
4. Mascara base
5. Black mascara

Additional Materials:
6. Cotton buds
7. Moisturizer
8. Powder foundation

THE STEPS:

1. Use a regular eyelash curler to curl your lashes.

2. Turn on your electric eyelash curler. Once it's hot, gently press the curler tip to the roots of your lashes. Your lashes should instantly curl better. One reason why I use a regular eyelash curler before this is because I find an electric curler better at enhancing curls, rather than just curling them.

3. Curl the bottom lashes as well.

4. You could use the tip of the curler to curl the bottom lashes. This will help you get to the shorter lashes at the outer and inner corner of eyes.

5. Apply about 2 coats of mascara base. Wait around 10 seconds between application of each coat. This will help thicken your lashes considerably.

6. Use a lash comb to comb out any clumps.

7. Now, this is the step that changes everything. Use your finger to gently lift up your eyelid. Using only the tip of your black mascara comb, push the roots of your lashes upwards. You are only applying mascara to the roots of your lashes (of course, you might get some mascara to the rest of your lashes by accident, as seen from above photo =D). This will create a firm foundation at the roots of your lashes and hold the curls up for a longer time!

8. Wait for the mascara at the roots of your lashes to be 60-70% dry. Then, apply mascara to the rest of your lashes in the usual zig-zag manner (I actually forgot to take a pic for this step!). Apply around 2-3 coats. Wait 5 sec at least between coats to create maximum volume. If you encounter clumps along the way, you can always comb them out with your lash comb later!

9. Use the tip of your mascara brush to apply mascara to lower lashes.

10. If you accidentally smudged mascara to your skin, no worries! Dub a little bit of moisturizer with a cotton bud (emulsion form recommended. try not to use cream).

11. Carefully 'roll' the cotton bud at the affected area to remove the mascara smudge. The mascara should come easily off!

12. Use the other side of the cotton bud and dub a little bit of foundation. Powder foundation recommended!

13. Touch up on the foundation you have removed while cleaning away the mascara smudge just now.

14. You could use your finger to gentle press your lashes to make them curl better!

15. Alternatively, use your electric curler again to lift any 'spidey' lashes. Take note to use your curler at the tips, ONLY,of your lashes to 'set' the curls. Do not apply to the roots of your lashes anymore, as the heat from the curler might 'melt' the mascara if you let the curler touch your lashes for too long.

16. Do the same for lower lashes.

FINALLY DONE!
To be honest, usually I spend the most time on my mascara application everyday (10-15 min). It really makes a difference to your makeup if you apply your mascara well.

I hope this tutorial has helped your in one way or another!!
Please let me know what you think!