Monday, January 31, 2011

OPI Shatter

OPI Shatter E59, SGD19

Ok I know this is not new~ but it's new to me! I discovered this exciting new polish from OPI that "shatters" into uneven "pieces" upon application~

It looks like just a normal black nail polish

I first applied base coat, then 2 coats of China Glaze SCI-FI, a Khrome purplish silver. After the polish is thoroughly dry, I apply one moderately thick coat of OPI Shatter.

The OPI Shatter dries matte in about 30 seconds, and amazingly cracks into intricate irregular patterns! If you apply a thinner coat, you get patterns that are smaller; if you apply a thicker coat, the polish cracks into bigger pieces.

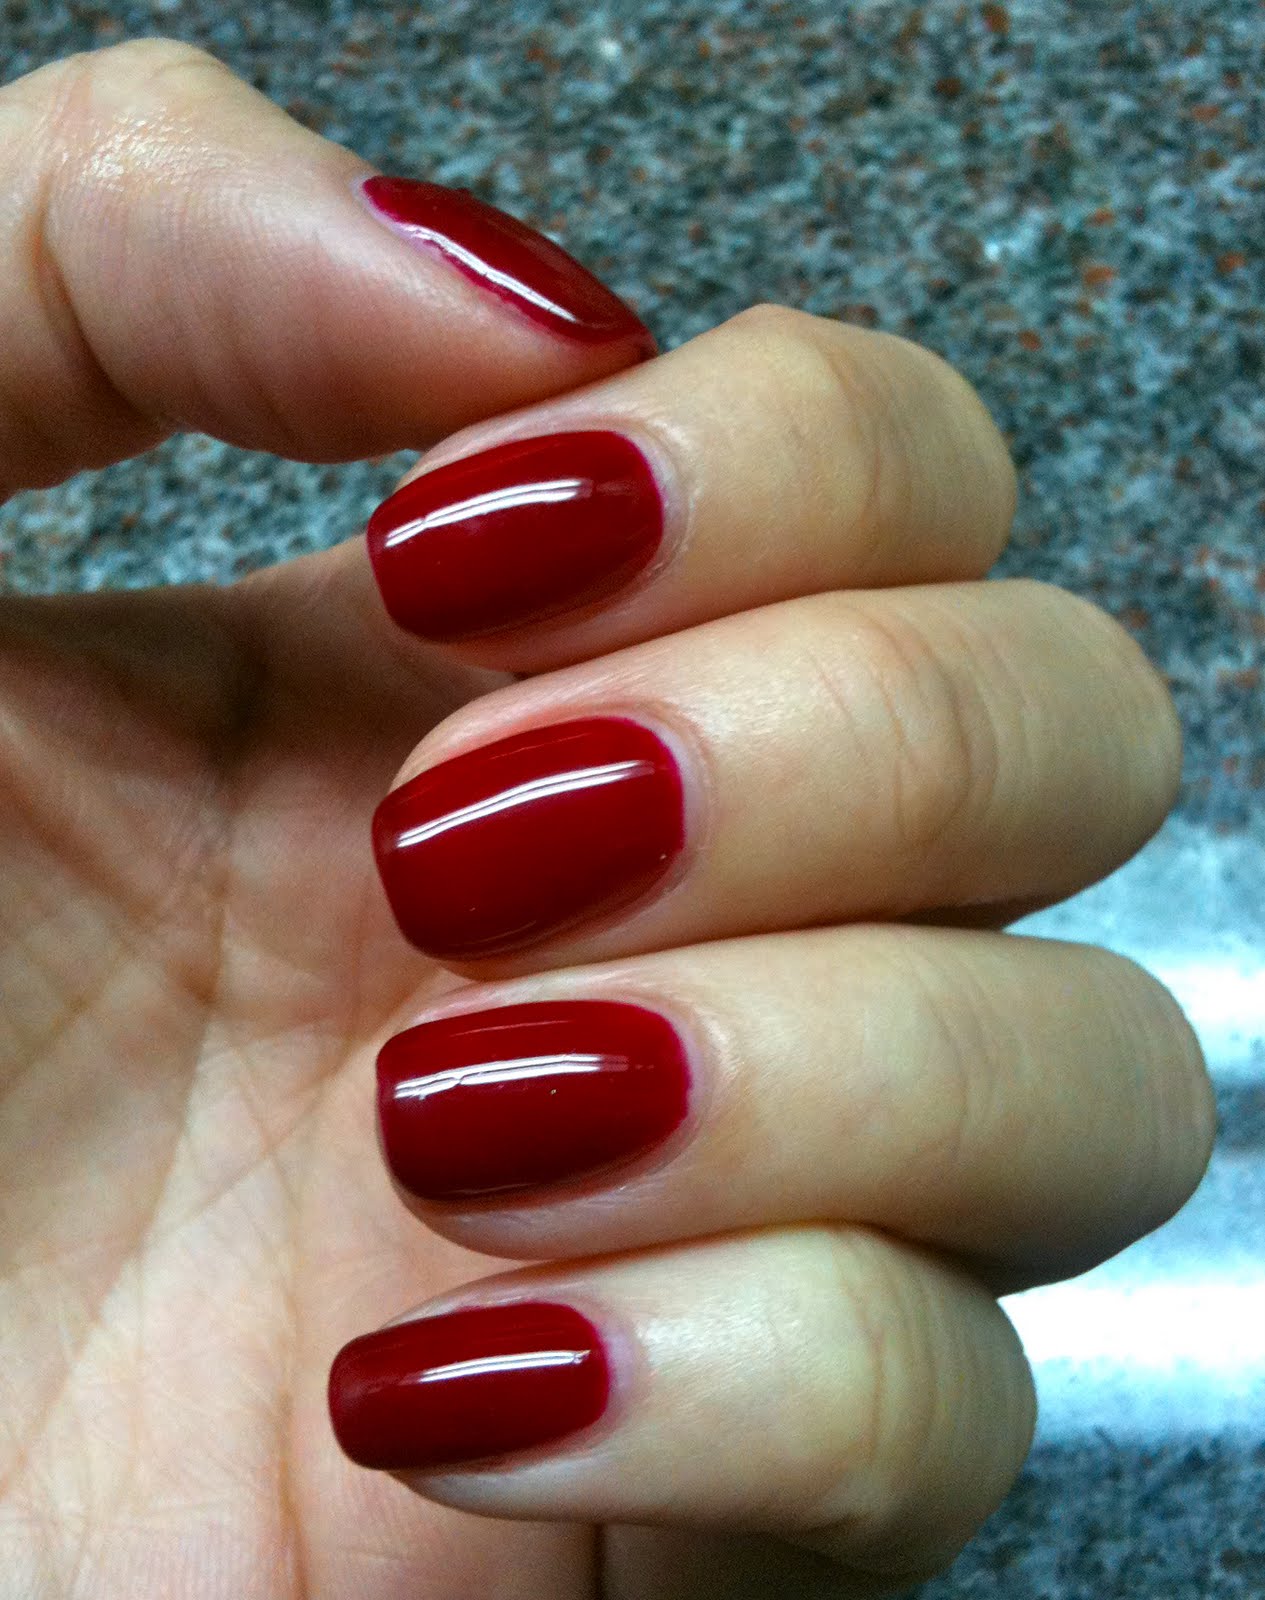
OPI Shatter over China Glaze SCI-FI with glossy top coat.

I experimented OPI Shatter over a few other colors of polish. I think Shatter works best over glitter polish and light, bright colors! My favorite is the pink on my pinkie!

On index finger: OPI Shatter over Ettussai Nail Color N in VI1 and Chanel Nail Color 237 Pepite

On middle finger: OPI Shatter over OPI Amazing Alice A56

On ring finger: OPI Shatter over Zoya Bekka

On pinkie: OPI Shatter over Anna Sui Nail Color N in 318

Quick get your own OPI Shatter and have lots of fun with it =)

Sunday, January 30, 2011

Review: NEW! Clarins White Plus HP Gentle Brightening Exfoliator

Clarins White Plus HP Gentle Brightening Exfoliator, 50ml, SGD60

I have always been a fan of Clarins' facial scrubs as they are gentle and effective. For a person who likes to try new products all the time, I remember myself finishing 3 tubes of the scrubs from Clarins sometime ago.

So after finishing all my peeling gels, I finally decided to go back to the Clarins scrub. I was pleasantly surprised when I saw that Clarins has revamped their packaging for the White Plus HP range. Instead of the old boring white and red, the tube is now a pretty light pink.


The SA told me there are not much differences between the old and new version (except for he packaging), but I notice that the new scrub contains red microbeads now instead of just white ones in the older version.


I like the scrub very much because the granules in the scrub are very fine and gentle on the skin. Last time, the SA told me it's gentle enough to be used everyday. However, to play safe, I usually only use 2-3 times a week.

The texture of this scrub is on the creamy side and has a light floral scent. It is best applied on dry skin.

This is the description of the product from the packaging:

"Tested in Japan and Asian skin, this very comfortable cream containing microbeads, deep cleanses, smooths, evens and brightens the skin. Oil-free."

I like the new version just as much as the old one. I do think the new version smoothens out my skin better. This is one scrub I will continue buying =) Great product!

Friday, January 21, 2011

Massive Haul from Singapore Blog Shop: Love, Bonito

Recently I have fallen in love with the clothes from a Singapore Blog Shop "Love, Bonito". Not only are the designs very trendy and cutting flattering, the prices are really REALLY reasonable too. The prices of most of their clothes range from SGD25-50. They carry a lower end range called "Love, Bonito", and a higher end range called "COVET". All their designs are original and the fabrics used are nothing short of excellent =) I buy most of my clothes from them now and here I post only some of my more recent purchases. I just made another huge order from them yesterday, and probably I will post some photos of that order when it arrives!

Byzantine Curve Dress in fuschia, SGD30, S size


COVET Charis Amour Dress in red, SGD45, S size

Red satin underneath black lace and mesh

Best Sunday Tog in cool blue, SGD28, free size


Labyrinth Maze Dress in Royal Purple, SGD29, free size


Au Courant Shrug in cream, SGD28, free size


Love, Bonito usually launches a new collection every week, and when they do, some designs get SOLD OUT within minutes! So if you are keen to buy their clothes, make sure you have fast fingers to add items to cart and fast internet connection! =)

Wednesday, January 19, 2011

Another Lipstick Haul: Lavshuca Moist Melting Rouge & Lipstick J (Shiny & Color)

On one of my recent posts, I raved about the Lavshuca Moist Melting Rouge. I couldn't help myself and grabbed a few more from Adam Beauty, alongside with the Coffret D'or 2011 Spring Collection items I wrote about earlier on.

LAVSHUCA MOIST MELTING ROUGE
HKD90 each

From left to right: RD4, BE5, OR3, PK5

From left to right: RD4, BE5, OR3, PK5

As you can see, the texture of these lipsticks is fantastic. You could read more about what I think in my previous post here.

LAVSHUCA Lipstick J (Color)/ (Shiny)
From top to bottom: Luvshuca Lipstick J (Shiny), Luvshuca Lipstick J (Color)

From top to bottom: Lavshuca Lipstick J (Color) WN-1, Lavshuca Lipstick J (Shiny) PK-2

From left to right: PK-2, WN-1

The texture of these 2 lipsticks is not definitely not as moisturising as the Moist Melting Rouge. I won't say they dry my lips up, but I don't think they are that moisturising either. PK-2 belongs to the 'Shiny' series and is very sheer upon application. WN-1 is a very pretty berry tone and I would love to wear it soon!

ANYWAY, don't forget to visit my new BLOG SHOP 'Clover and Mar' for 1-of-a-kind 100% handmade accessories!

My Blog Shop: Clover and Mar


Hi all~

By now I am sure all my readers know that I am crazy over anything to do with beauty!

My friend, Margaret and I have started an online blog shop called "Clover and Mar". She is the supplier for materials and I am the designer+maker for all the accessory pieces. All the beads and materials used in the designs are all painstakingly handpicked by me and all pieces are my original designs. Currently I have only started making earrings (hopefully more to come!)

All earrings are 1-of-a-kind! You will never be caught wearing the same pair of earrings as the lady sitting beside you =)

As we have only recently started this blog shop, designs are still rather limited. We will try to update with new collections soon! For now, please support our 2011 Spring Collection #1: The Angelic Series here ^^

Saturday, January 15, 2011

*UPDATED MORE PHOTOS* Kawaii Bright Pink G[Mask] Crystal Handphone Skin Wrap

Since I am too poor to get iPhone 4 and need a change from my Hello Kitty Handphone cover, I got my iPhone 3Gs skin wrapped today! I am beyond pleased with it!


It's bright pink! I chose this super Kawaii design~ The person who wrapped my phone also added crystals to the shoes, belt, necklace and bag of the girl in the design. I added 3 more crystals to her hair when I got home. Each crystal cost me additional SGD1 (yup the crystals are super not worth it, but since I have already decided to spend the money, I just got it done)!


As I have a few super horrible cracks at the front screen of my phone (phone is still in perfect working condition, been using it with the cracks for more than half a year), I got the front wrapped as well. To wrap the phone front and back, it was SGD59. I added 17 Swarovski crystals, so the whole service cost SGD76.


The side of the phone was also covered nicely in a metallic pink color.

Handphone skin wrap has become increasingly popular nowadays, not only because of its protective functions, but also the highly personalised designs one could get for their gadgets. According to the G[Mask] website, the features of the G[Mask] Skin are as such:

1. Thinnest protective skin -- 0.10mm
2. Durability -- Up to 7 years
3. Full protection -- Scratch resistant
4. Full gadget body skin wrap
5. Guaranteed no residual
6. Water resistant

I can't stop staring at my phone now. So pretty~~~~~

Friday, January 14, 2011

Coffret D'or 2011 Spring Collection: Beauty Sharp Designer in 03 Rose Red and Eye Appeal Shadow in 01 Sweet Brown

I had been waiting for this package, and it finally came today! Totally cheered me up from the Bird's Nest allergy incident =)

Beauty Sharp Designer in 03 Rose Red, HKD295 from Adam Beauty

For creating a more 3D face shape
The brown strip below the blusher is used for creating highlights (the lightest shade) and shadows at the jawline for the look of a smaller face (darker shades)

A soft flush for the cheeks, more coral than rose in my opinion. This pic shows all colors mixed

Color can be built up for a more intense look

I like this blush the moment I swatched it on the back on my hand. I can imagine how soft and pretty the color will turn out on my cheeks. I can't wait to test it out on my face! Personally I don't really think I will use the colors separately because the colors are pressed quite closely together and I will find it tiresome to dip each color individually with my brush.

Eye Appeal Shadow in 01 Sweet Brown, HKD295 from Adam Beauty

As usual, very shimmery and good quality eye shadow from Kanebo

I think the most unique shades in this palette is the light pink and dark liner color. The pink is to the cool side, with a tinge of purple. The shimmer is crazy! The dark liner color looks dark grey in the palette, but when I swatched it, it looked purplish brown! I love it =) The texture of these 2 shades is different too; I believe they are semi-cream, unlike the other 2 colors which have a more powdery texture. I think this palette has an awesome combination and doesn't look boring at all... not like the usual pink and brown combinations.


I chose the black casing for the blusher and white one for the eyeshadow. The black one looks very sophisticated and the white extremely chic. It's not plain white, but has an iridescent glow (pink and blue) to it.

Thumbs up for the Spring Collection. I will buy the 04 Nude Beige and 05 Mint Purple for the eyeshadow next month as well, if Adam still has stock then! To be honest, I thought the collection would not be very exciting when I saw it online, but when I swatched it, my view totally changed. It's just the same with the Lunasol Aurora Eyes. I think for Kanebo eyeshadows, they might look boring in pictures, but once you swatch them and see the colors in person, you will definitely fall in love with them!

I will do a simple tutorial using the 01 Sweet Brown once the swell of my eyes subside, which I hope will be soon!

Bird's Nest Allergy

Last night something extraordinary happened.

As a part of my new skincare routine, I started taking bottled bird's nest about 2 weeks ago. Bird's Nest is a popular health food that is supposed to help skin look fairer, firmer and more youthful, mainly because it contains a large amount of collagen.

So anyway, after two weeks (3 bottles a week), nothing happened, until last night close to midnight, when I developed a STRONG and sudden allergy after drinking a bottle for about 4 hours. I felt breathless and my eyes started to itch. In a matter of like 3 minutes, my eyes swelled to the size of ping pong balls, and by the time my husband drove me to a 24-hr clinic, I couldn't open my left eye, while I managed a slit for my right. I was still having difficulty breathing. The doctor couldn't help me as, ironically, I was allergic to Piriton, a common drug known to control allergy. He gave me some steroids and urged me to go to the Accident & Emergency department at the hospital immediately.

So the people at the hospital said that I needed "immediate attention" (I think they were worried that I might not be able to breath soon due to the possible blockage of airway) and rolled me in a wheelchair to this emergency ward. They gave me more medicine through the veins (ok the insertion of the needle was a little...) and observed me for 2 hours or so. At around 2am or so, they decided that I was alright and transferred me to the observation ward. The nurses came to check on my blood pressure regularly and I was really bored, mainly because I couldn't open my eyes, so I couldn't do anything, except to try to sleep.

The next morning the doctor came to check on me and said that I was well enough to be discharged. She warned me that there might be a recurrence within 12 hours and told me to return immediately if it happens. She gave me more medicine for the next 5 days and off to home I went!

Now, I must say, I don't look like myself at all. Totally unrecognisable still. Although my breathing has returned to normal, I look like E.T with huge and sausage alike eyes. My vision is affected and I have to tilt my head up to see. Luckily, I can still open my eyes enough (and after sleeping a lot) to write a blog post, or else I am really going to be so so so bored!

I just hope my eyes will return to normal as soon as possible, or my colleagues are so going to stare at me as if I am an alien (though I really look like one now) on Monday (I can't possibly take another day off work). I heard that it might take as long as 72 hours for the swelling to subside! ARGH~~~~~

So no more bird's nest for me. Not fated to eat luxurious health food! It's such a pity because I was enjoying the effects of it so much. I had such smooth and radiant skin the 2 next days each time I took a bottle... sigh sigh sigh!

My Adam Beauty package with my new Luvshuca (more melting rouge) and Coffret D'or (Spring 2011 Collection) stuff came today! I will write a post on it tomorrow, or even tonight! Anyway, sorry for the lack of new posts recently... as I have been crazy saving and haven't been able to buy too many new products. Intended to do a tutorial this weekend, but sigh... alien eyes...

Saturday, January 8, 2011

*Update* Gelish (Color - Stand Out)

This is a follow up on my previous post on Gelish. In the end, the Gelish did not really last for 3 weeks. I removed them on day 12.

The process of applying Gelish was much more pleasant than normal gel nails, because the time taken was much shorter. My manicurist first shaped my nails, then removed the excess cuticles. After that, she gently buffed my nails and applied 2 coats of clear stuff on them -- I don't know what they are exactly, but one of them was to protect my nails from the chemical stuff of Gelish, while the other was to help the polish stick better onto my nails. Then she applied one layer of the Gelish color Stand Out, nails cured under UV light for about 2-3 min. This process was repeated 2 more times. Finally she applied a clear top coat, cured under light, and finished with cleaning the nails (to remove the stickiness of the Gelish product) with some solution.

Gelish Day 2

Tips on Day 2

The manicure looked perfect on day 2. My nails looked very shiny, as if I had just come out of the nail salon and the color on my nails has not fully dried yet =)

Day 4

Day 4

Still perfect, with slight scratches on the nails, which I am fine with. Still VERY SHINY.

Day 7
Day 7

Nothing much still. Nails remain shiny, no chip. Some more scratches. And the gaps between the color and my cuticles have become more obvious.

Day 9

Day 9

Day 9 - chip on my right hand index finger

On day 9, the color on my right hand index finger finally chipped. Reason for this chip is because my real nail had started to chip. I did not find it a big issue and filed away the chip with a normal nail file.

Day 12

Day 12

On day 10, the color on my middle finger started peeling (in one whole piece) as I was having a hot shower (42 Degree Celsius). I think the peel was partly caused by the heat. Me being me, I couldn't stand anymore chips and got them removed the next day. Actually, I am pretty relieved that the Gelish chipped, because I was getting a little bored with the color and needed a change.

However, I still think Gelish is great when you go for holidays. I would give Gelish 4 out of 5. One point taken away, for the fact that my nails still felt dry and weak after removing them...